Systemy video tutorial
SYSTEMY LEARN
Everyday tasks. Clear steps.
Learn how to manage your products, sales, invoices, purchases and stock. Choose a task and follow the steps in your own Systemy workspace.
Choose a topic or search for a task, then follow the steps in Systemy.
Available features depend on your subscribed apps and access permissions. Contact support if you need help.
Products
Add a product
- Open Sales or Inventory, then Products → Products → New.
- Enter a clear name, sales price and internal reference. Enable Sales and, if you buy this item, Purchase.
- Choose Goods and enable Track Inventory when you need stock quantities. Older versions may call this Storable Product.
- Add the category and image, save, then reopen the product to check its details.
1Sample product: Training Cotton T-shirt
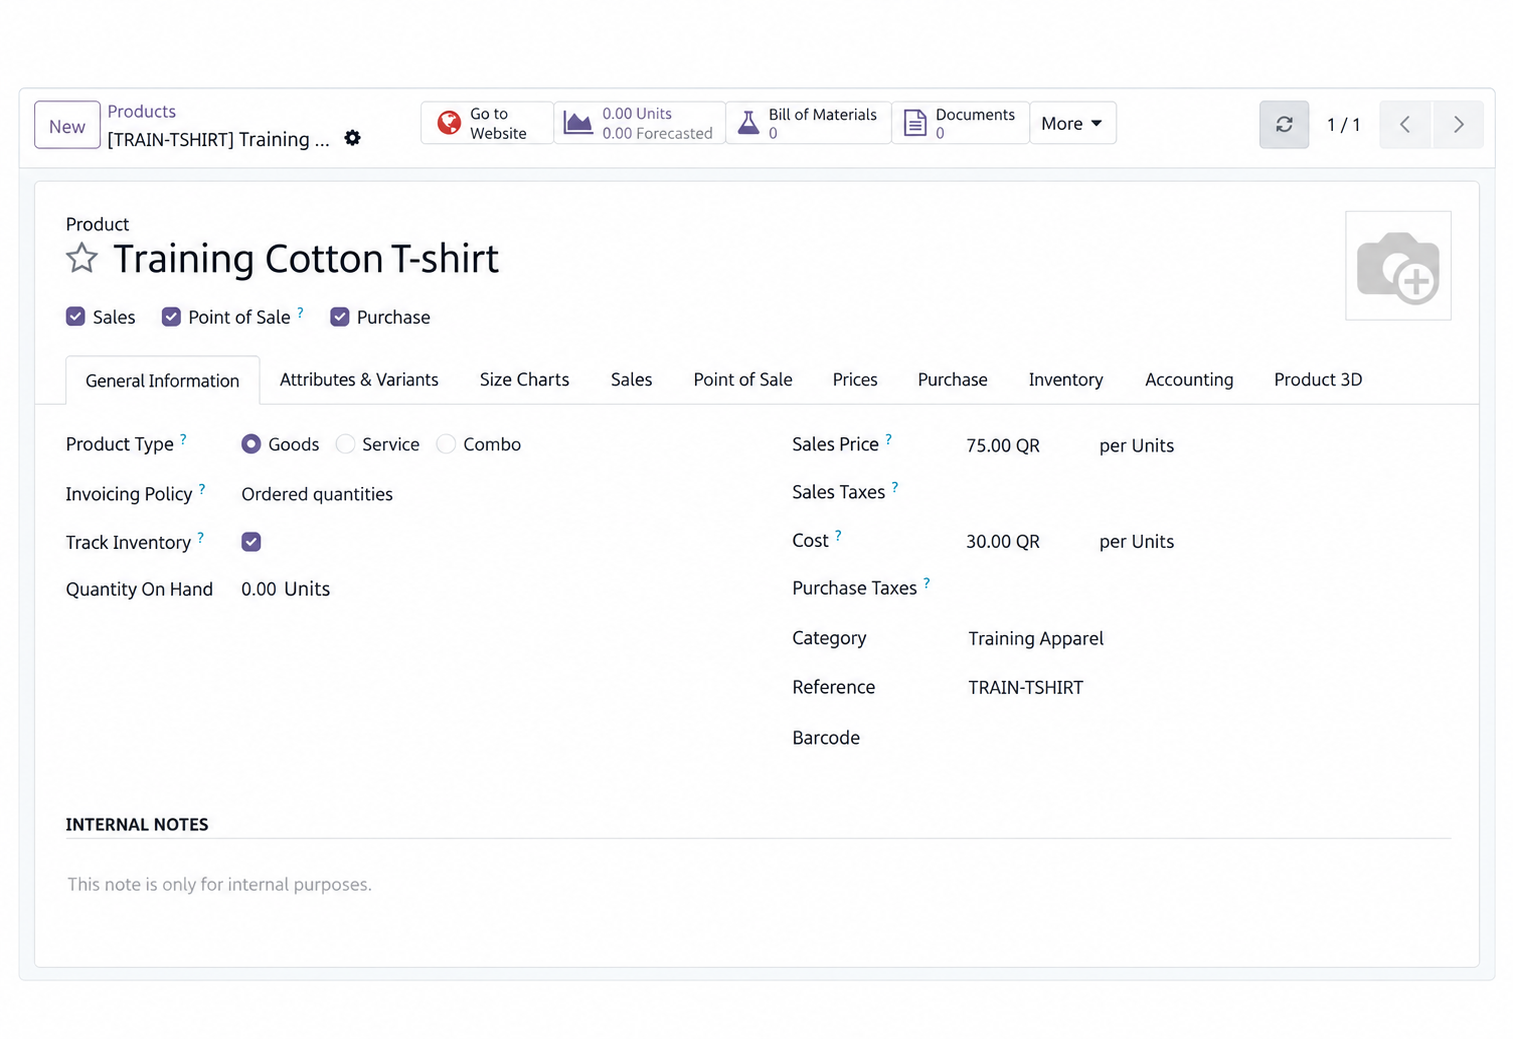
Enter the product name, sales price and category. This example uses a price of 75 QAR and the Training Apparel category.
View screenshot full size ↗Edit a product and its price
- Open Products and search for the item by name or internal reference.
- Open the record and use Edit if your screen requires it.
- Change the name, sales price or description, then save.
- Check a new quotation or cart. Existing order lines and pricelist rules may retain different prices.
1Sample product: Training Cotton T-shirt
Enter the product name, sales price and category. This example uses a price of 75 QAR and the Training Apparel category.
View screenshot full size ↗Changing a product price does not rewrite confirmed sales or posted invoices.
Direct link to this guideAdd or replace a product image
- Open the product record and select its image area or edit-image icon.
- Upload a clear image of the correct product. If a media picker is available, choose an existing image.
- Save the product and check that the image loads.
- For products with variants, open the relevant variant before assigning an image specific to that option.
Duplicate an existing product
- Open the product you want to use as a starting point.
- Choose Duplicate from the action or gear menu.
- Replace the copied name, reference and barcode. Review price, attributes, taxes and sales settings.
- Save and verify the new record. Enter its stock separately through the correct inventory workflow.
2Product actions menu
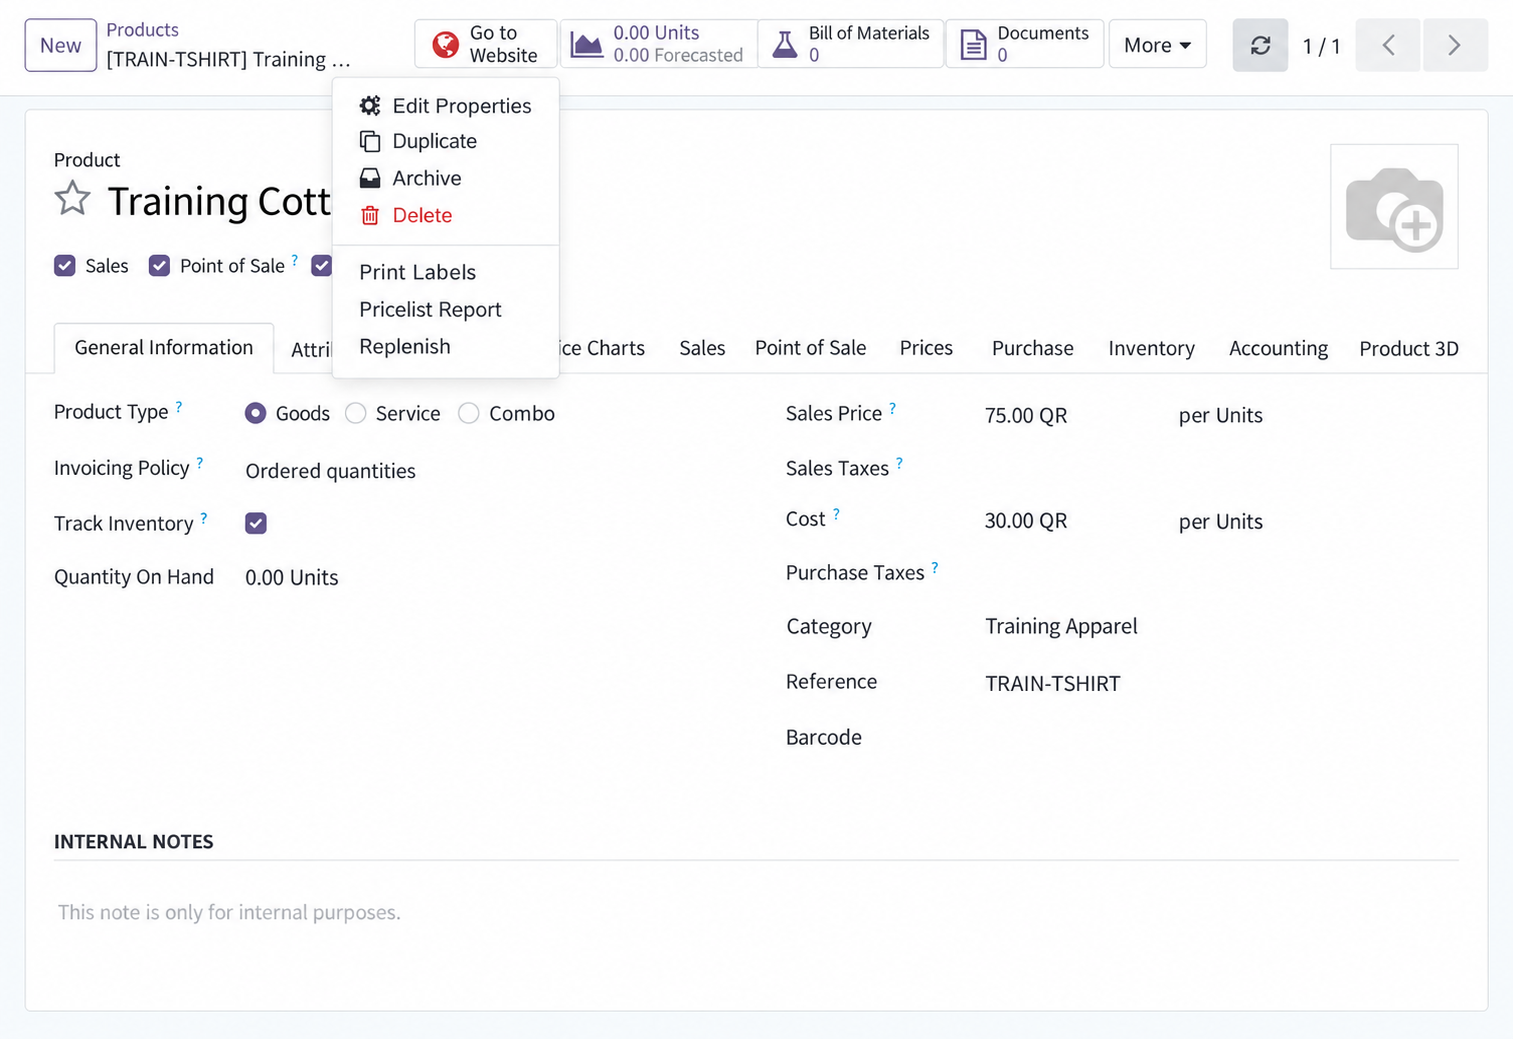
Open the actions menu to find Duplicate, Archive and Delete. The screenshot shows the available actions; no product was deleted.
View screenshot full size ↗Archive and restore a product
- Open the product and check for stock or unfinished orders that still need handling.
- Choose Archive from the action menu and confirm.
- To find it again, open Products and apply the Archived filter.
- Open the archived record and choose Unarchive to make it available again.
2Product actions menu
Open the actions menu to find Duplicate, Archive and Delete. The screenshot shows the available actions; no product was deleted.
View screenshot full size ↗Archiving keeps the transaction history. It does not cancel existing orders or remove stock.
Direct link to this guideDelete an unused product
- Find and open the unwanted product. Confirm it is the correct record.
- Check that it has no stock, sales, purchases, invoices or other linked history.
- If it is unused, choose Delete from the action menu and read the confirmation before proceeding.
- If Systemy blocks deletion, archive the product instead. Do not remove business records to force deletion.
2Product actions menu
Open the actions menu to find Duplicate, Archive and Delete. The screenshot shows the available actions; no product was deleted.
View screenshot full size ↗Deletion is permanent. Use Archive for products that have already been used.
Direct link to this guideCategories
Choose the right category type
- Use Product Category to organize products internally and, where configured, their inventory or accounting settings.
- Use POS Categories to organize the buttons or groups cashiers see.
- Use eCommerce Categories to organize the categories shoppers browse on your website.
- Open the product and assign the relevant fields separately; changing one category type does not automatically update the others.
3Sample internal category: Training Apparel
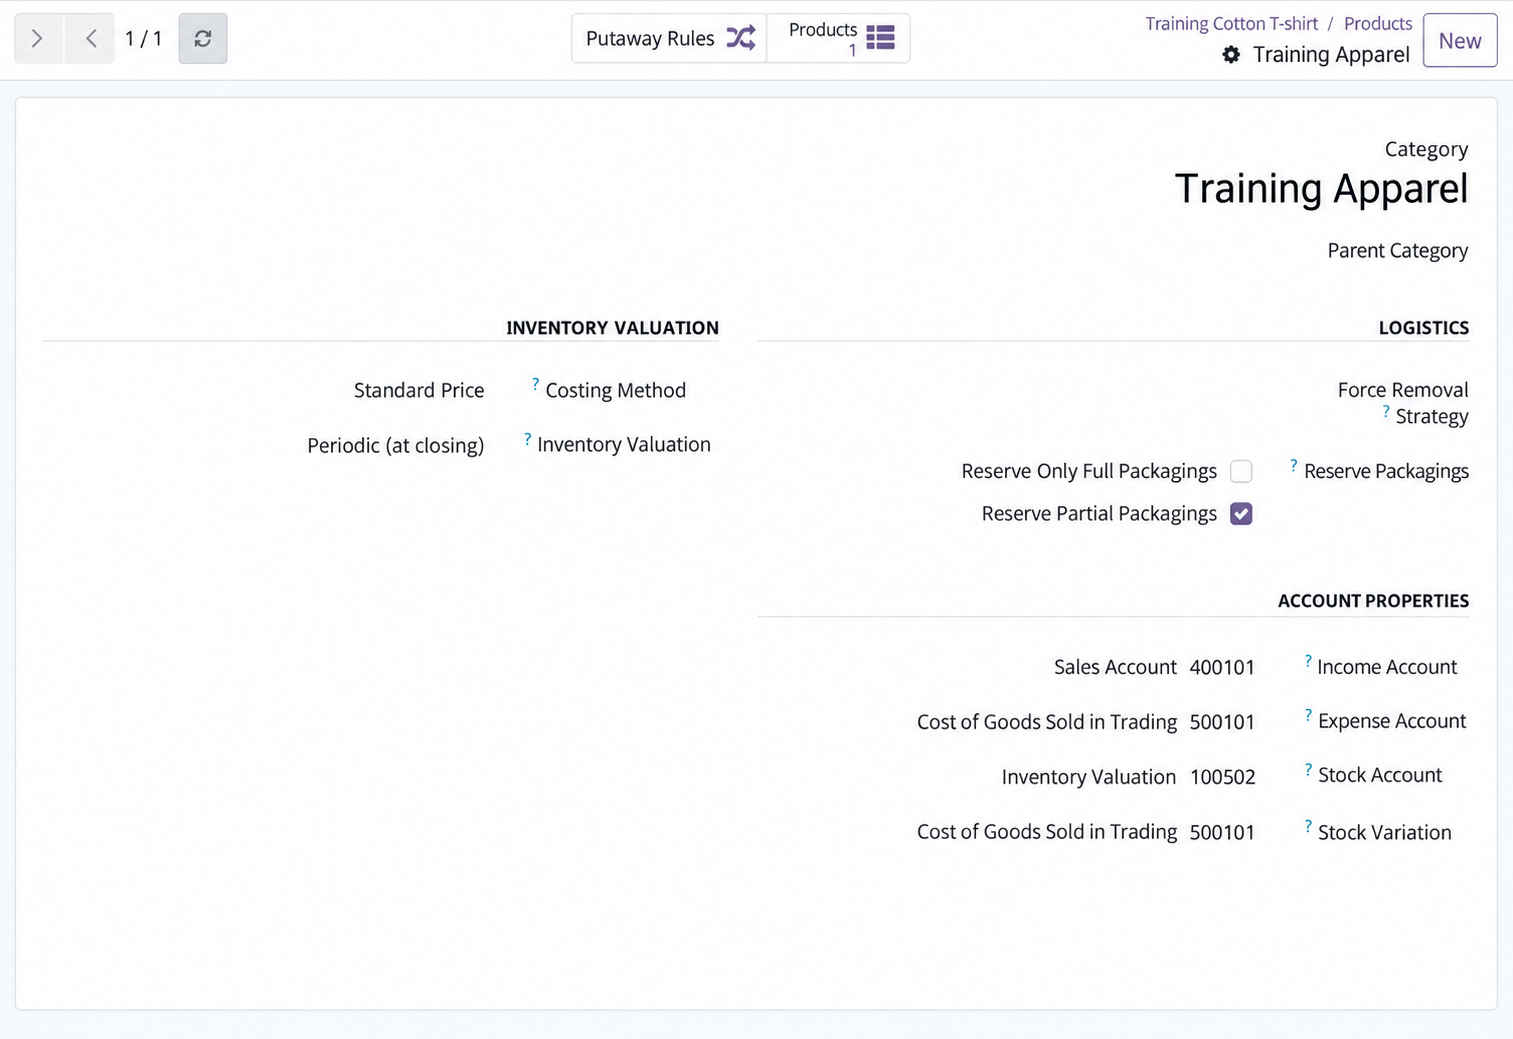
Name the category and use Parent Category when you need a hierarchy. The accounting fields shown belong to the demo configuration.
View screenshot full size ↗Create an internal product category
- Open Inventory → Configuration → Product Categories. This menu may require manager access.
- Select New and enter a specific category name, such as Accessories.
- Choose a Parent Category only if this category belongs under another category.
- Save, open a product and select the new Product Category.
3Sample internal category: Training Apparel
Name the category and use Parent Category when you need a hierarchy. The accounting fields shown belong to the demo configuration.
View screenshot full size ↗Keep existing costing, valuation and account settings unless your accountant has approved a change.
Direct link to this guideRename a category or change its parent
- Open the relevant category list: internal, POS or eCommerce.
- Open the category and update its name or parent.
- Save and check the category hierarchy for unexpected nesting.
- Review a product using this category and, for store categories, check the customer-facing menu.
3Sample internal category: Training Apparel
Name the category and use Parent Category when you need a hierarchy. The accounting fields shown belong to the demo configuration.
View screenshot full size ↗Move a product to another category
- Open the product you want to reorganize.
- Change Product Category for internal classification, or the POS/eCommerce category fields for those channels.
- Save and reopen the relevant product list or storefront.
- Check that the product appears under the intended category and that its other category assignments remain correct.
1Sample product: Training Cotton T-shirt
Enter the product name, sales price and category. This example uses a price of 75 QAR and the Training Apparel category.
View screenshot full size ↗Changing an internal category can affect inventory and accounting rules. Check with your accountant when the categories use different settings.
Direct link to this guideCreate a point-of-sale category
- Open Point of Sale → Configuration → POS Categories or Product Categories, depending on your version.
- Create a category and enter its name. Add a parent or image if those fields are available.
- Open each relevant product and assign the category in its Point of Sale settings.
- Save and check the POS after a safe reload with all paid orders synchronized.
Delete an unused category
- Open the category and identify its products and any child categories.
- Move those products and child categories to a suitable replacement category first.
- Return to the unused category, choose Delete and confirm only after checking its name.
- If deletion is blocked by linked records, keep the category and contact support rather than deleting transaction history.
Attributes & variants
Create an attribute such as size or color
- Open Sales → Configuration → Attributes. Ask your administrator to enable variants if this menu is missing.
- Select New, name the attribute and choose its display type.
- Add values, such as Small, Medium and Large, or Black and Blue.
- Choose the variant creation mode before using the attribute, then save.
4Sample attribute: Training Size
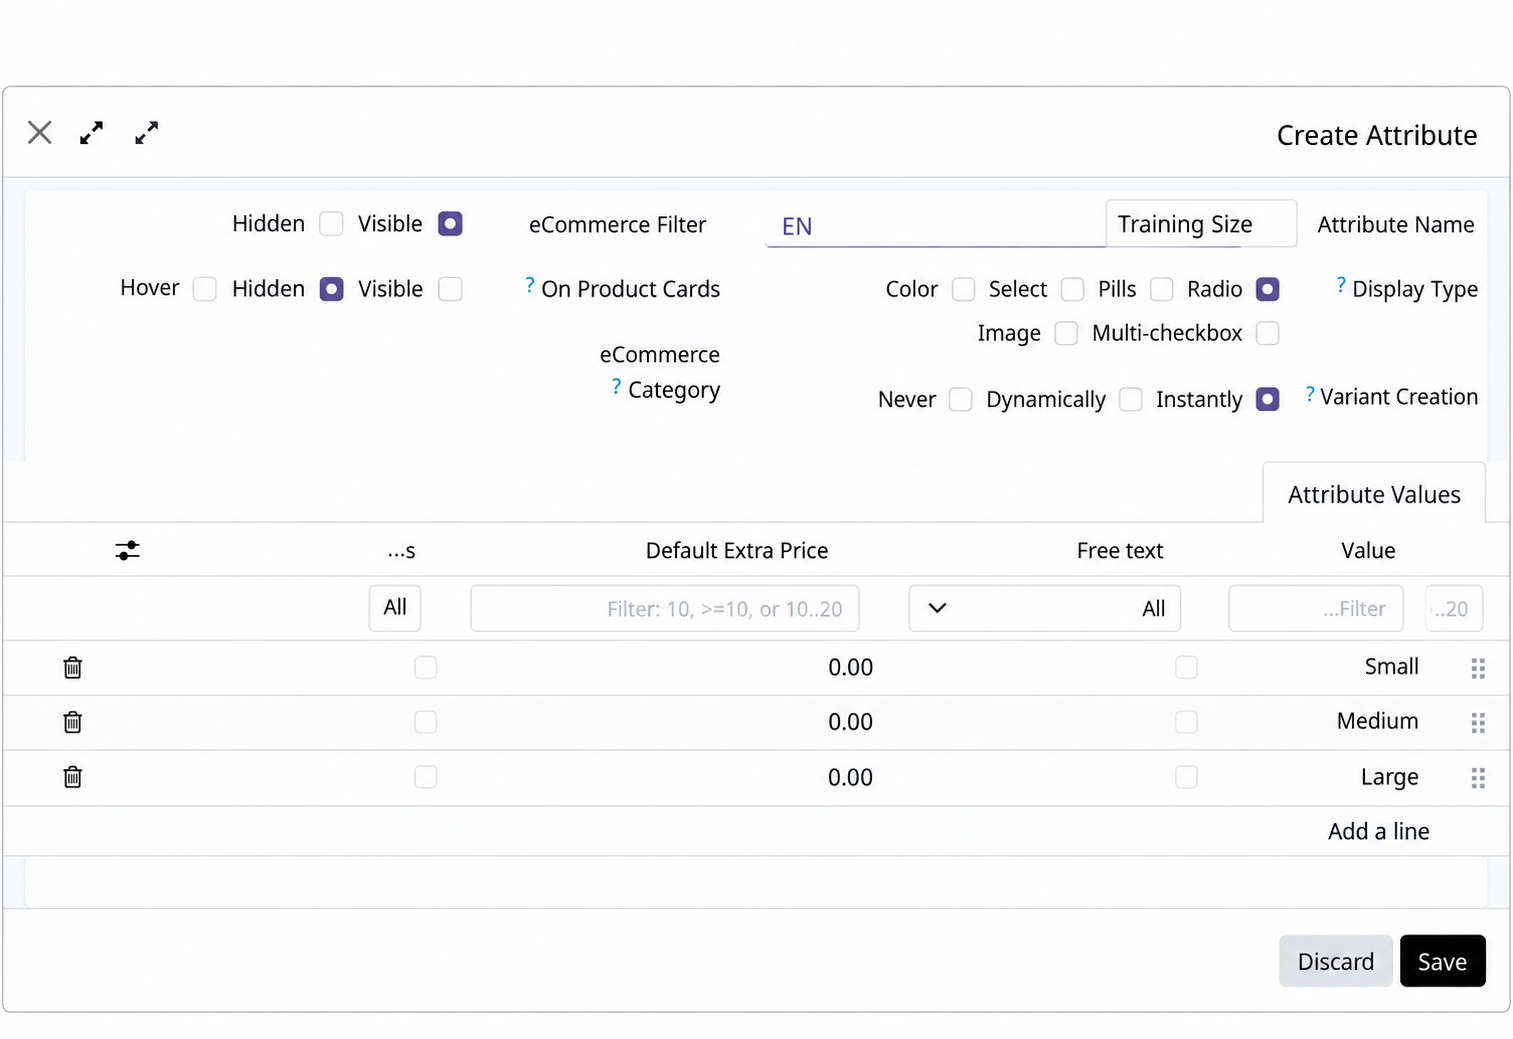
Create a size attribute, choose its display and variant creation options, then add Small, Medium and Large. This screenshot uses the English interface.
View screenshot full size ↗The variant creation mode cannot normally be changed once the attribute is used on a product.
Direct link to this guideAdd a new value to an attribute
- Open the existing attribute from Configuration → Attributes.
- Add the new value, for example XL, without renaming an unrelated existing value.
- Save, then open each product that should offer this value.
- In Attributes & Variants, add the value to that product and save. Check the resulting combinations.
4Sample attribute: Training Size
Create a size attribute, choose its display and variant creation options, then add Small, Medium and Large. This screenshot uses the English interface.
View screenshot full size ↗Add size and color variants to a product
- Open the product and its Attributes & Variants tab.
- Add one line for Size and choose the sizes actually sold.
- Add another line for Color and choose the available colors, then save.
- Review the variants. Two sizes and three colors can produce six combinations when creation is set to Instantly.
5Three sizes on one product
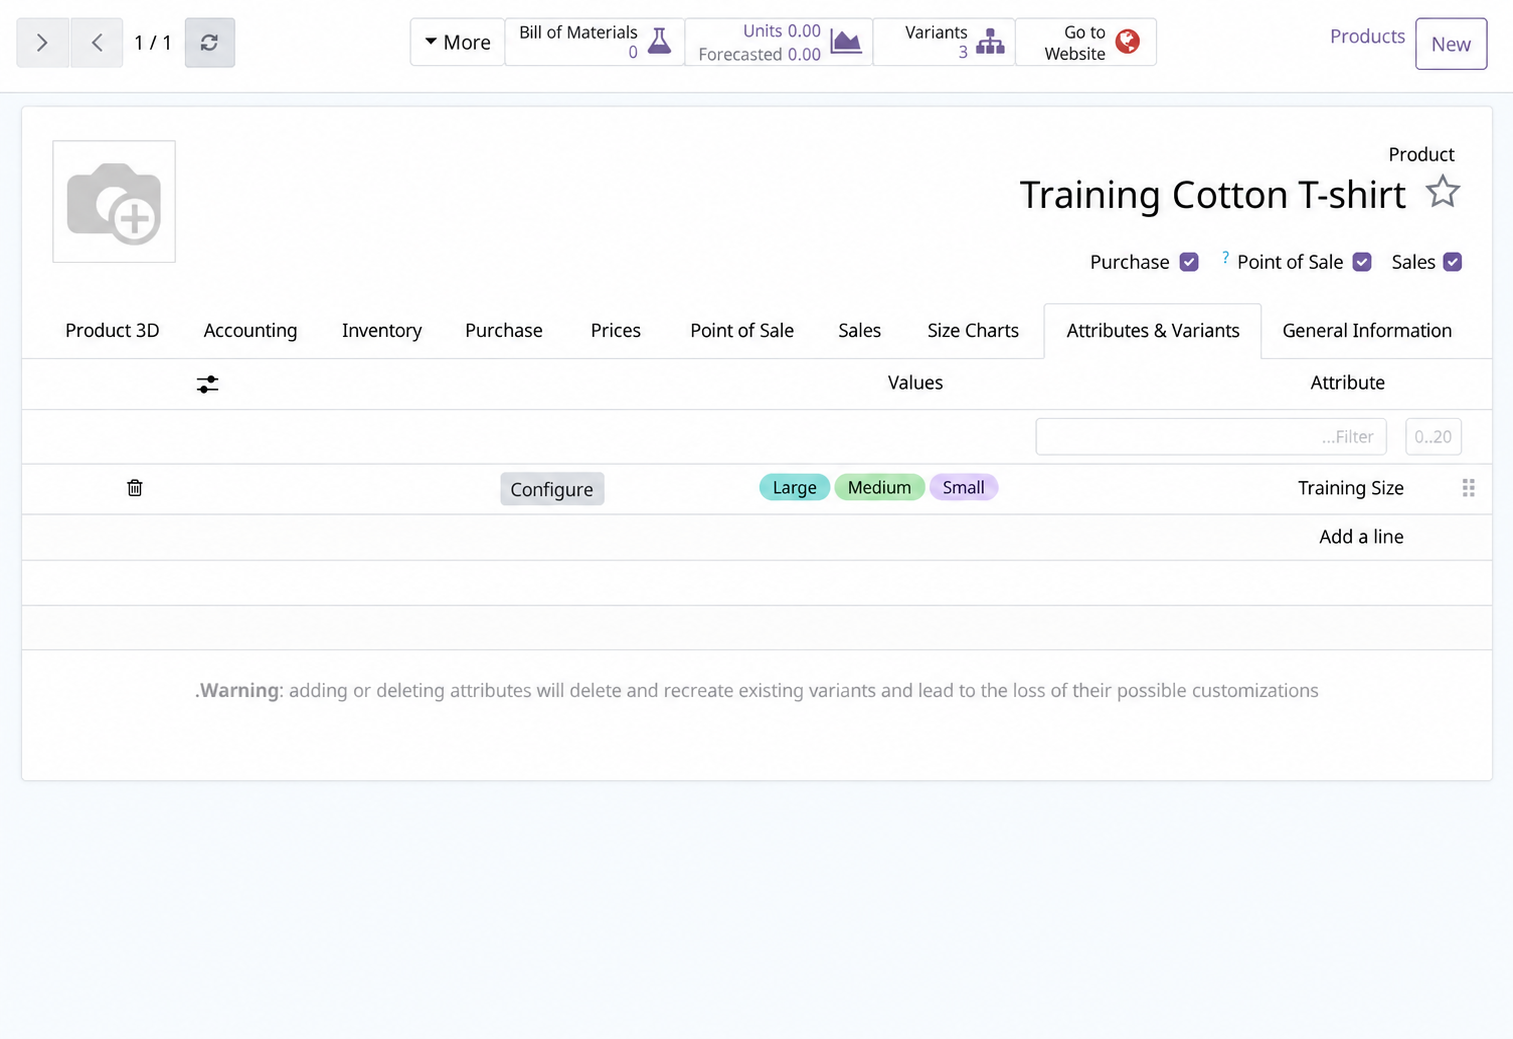
The Attributes & Variants tab links Training Size to Small, Medium and Large. Configure opens the value settings.
View screenshot full size ↗Dynamically creates variants when used in sales; Never does not create separate stock variants.
Direct link to this guideAdd an extra price for an option
- Open the product and go to Attributes & Variants.
- Use Configure on the relevant attribute line when available.
- Set the Value Price Extra for the option and save.
- Test a new quotation with that option. Review the base price, extra amount and any active pricelist.
Give each variant its own barcode
- Open Products → Product Variants or the Variants button on the product.
- Open the exact combination, such as Blue / Medium.
- Enter a unique internal reference and barcode, then save.
- Scan the barcode in a test search and check that the correct variant is selected.
Do not reuse one barcode for different variants.
Direct link to this guideEdit or remove an attribute safely
- Open the attribute and check which products use it before changing a value name.
- Correct a spelling mistake only when the value still means the same thing for every affected product.
- For a discontinued combination, open the specific variant and use Archive where available.
- Delete an attribute or value only when unused and Systemy allows it. Stop if a linked-record warning appears.
5Three sizes on one product
The Attributes & Variants tab links Training Size to Small, Medium and Large. Configure opens the value settings.
View screenshot full size ↗Removing values from a product can change its variants. Review stock and open orders first.
Direct link to this guideCustomers & suppliers
Add a customer
- Open Contacts → New, or use New in the customer list of Sales.
- Choose an individual or company and enter the customer's name.
- Add a phone number with country code, email and address. Search for an existing matching contact first.
- Save and select the customer on a new quotation to check the details.
6Fictional customer contact
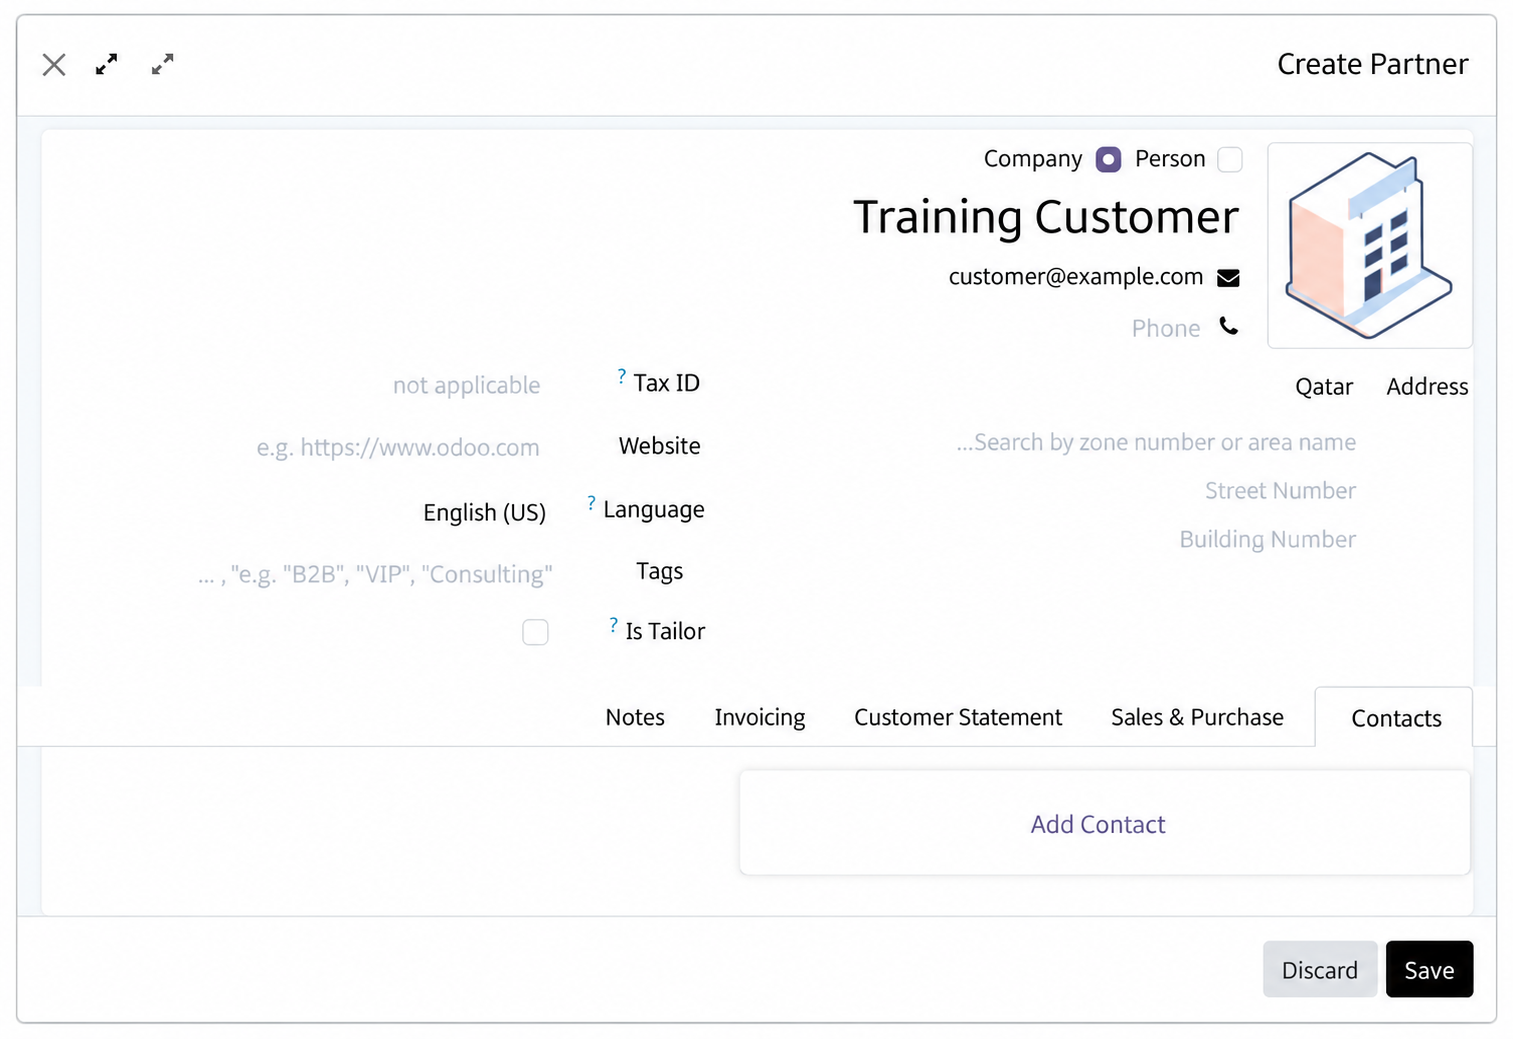
Training Customer uses customer@example.com. Enter your own customer details and addresses in these fields. This screenshot uses the English interface.
View screenshot full size ↗Update a customer or supplier
- Open Contacts and search by name, phone or email.
- Open the matching record and verify that it is the correct person or company.
- Edit the contact details and save.
- Check the details on new documents. Review existing drafts separately; posted documents may retain their original details.
6Fictional customer contact
Training Customer uses customer@example.com. Enter your own customer details and addresses in these fields. This screenshot uses the English interface.
View screenshot full size ↗Add a supplier
- Open Purchase → Orders → Vendors, or open Contacts.
- Search for the supplier first to avoid creating a duplicate.
- Select New and add the supplier's name, contact information and address.
- Save and select the supplier on a new request for quotation.
Add a separate invoice or delivery address
- Open the customer's contact record.
- Under Contacts & Addresses, choose Add and select Invoice Address or Delivery Address.
- Enter the recipient and complete address, then save the address and customer.
- Open a quotation and check the invoice and delivery address fields before confirming.
6Fictional customer contact
Training Customer uses customer@example.com. Enter your own customer details and addresses in these fields. This screenshot uses the English interface.
View screenshot full size ↗Archive an old customer or supplier
- Open the contact and review outstanding invoices, bills and orders.
- Use Archive from the action menu when the contact should no longer be selected for new work.
- Existing documents keep their link to the archived contact.
- To restore the contact, apply the Archived filter and choose Unarchive.
Delete an unused duplicate contact
- Search both records and compare names, phone numbers and linked documents.
- Keep the record used on transactions. Do not delete a customer or supplier with business history.
- Open the unused duplicate, choose Delete from the action menu and review the confirmation.
- If Systemy blocks deletion, archive it or ask support to review the duplicates.
Quotations & sales
Create a quotation
- Open Sales → Orders → Quotations → New.
- Select the customer and check the invoice address, delivery address and currency.
- Add products, exact variants, quantities and unit prices. Review discounts and configured taxes.
- Set the expiry date and payment terms if needed, then save and review the total.
Edit or delete a draft quotation
- Open the quotation and confirm that it has not become a confirmed sales order.
- To edit it, change the products, quantities or prices and save.
- If the customer already received an earlier version, send the revised quotation and explain the change.
- To remove an unused draft, use Delete from the action menu if allowed. Use the cancellation workflow for confirmed orders.
Send a quotation or download its PDF
- Open the saved quotation and check the recipient's email address.
- Choose Send by Email and review the subject, message and attachment.
- Send once and check the document's message history for the outgoing message or an error.
- For a PDF copy, use Print → Quotation / Order where available.
Confirm a quotation as a sales order
- Open the customer's accepted quotation.
- Recheck product variants, quantities, addresses, prices and agreed delivery details.
- Choose Confirm and check that the document becomes a Sales Order.
- Open the linked delivery or invoice actions to continue the next required step.
Confirming a sale does not prove that goods were delivered or payment was received.
Direct link to this guideCreate an invoice from a sales order
- Open the confirmed sales order and check its delivered and invoiced quantities.
- Choose Create Invoice and select the appropriate invoicing option.
- For delivered-quantity products, validate the actual delivery first if there is nothing to invoice.
- Review the draft invoice and confirm it only when the quantities and amounts are correct.
Cancel a sales order correctly
- Open the order and check whether it has deliveries, invoices or payments.
- If nothing has been completed, use Cancel and follow any linked-document prompts.
- For delivered goods, process the return; for posted invoices, handle the credit note with your accounts team.
- Recheck the order, delivery and invoice statuses so no unfinished obligation is overlooked.
Cancelling an order alone does not refund money or put delivered goods back into stock.
Direct link to this guideCustomer invoices
Create a customer invoice
- Open Invoicing or Accounting → Customers → Invoices → New.
- Select the customer, invoice date, due date or payment terms and currency.
- Add products or descriptions, quantities and prices. Check the configured taxes and total.
- Save as draft, review the complete invoice and use Confirm/Post when it is ready to issue.
7Draft invoice with sample data
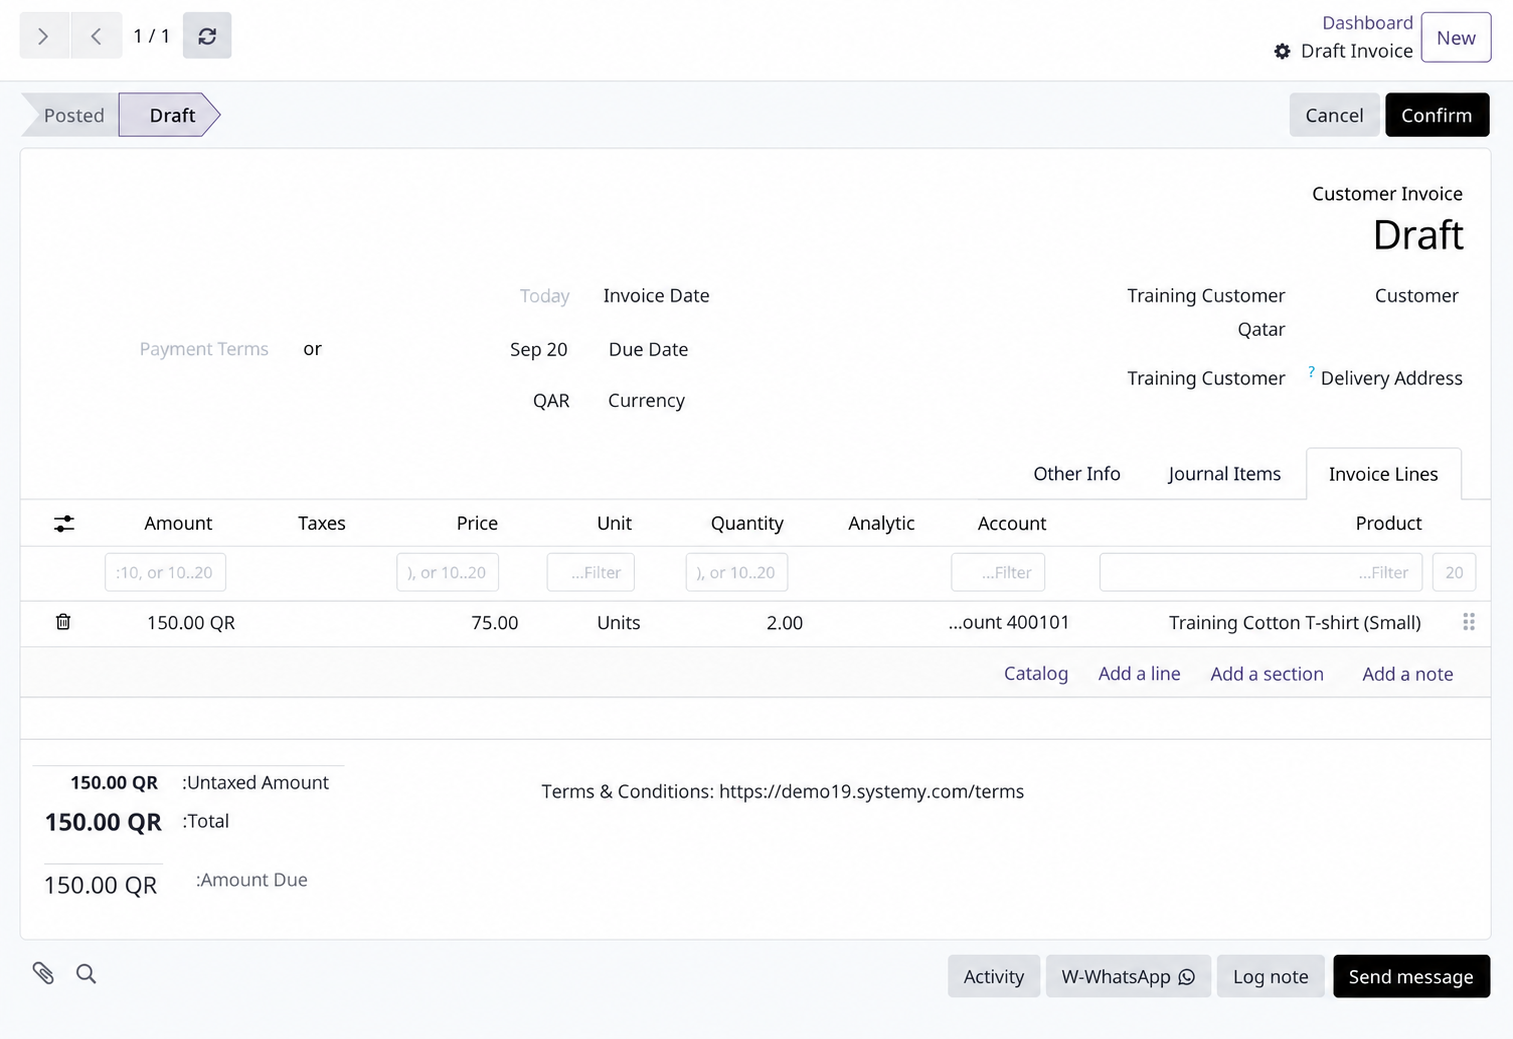
Training Customer: 2 T-shirts × 75 QAR = 150 QAR. Review the customer, quantity, price and draft status before confirming your own invoice.
View screenshot full size ↗If the invoice belongs to a sales order, create it from that order to preserve the link and avoid duplicates.
Direct link to this guideEdit or delete a draft invoice
- Open the invoice and check that its status is Draft.
- Correct the customer, date or invoice lines, then save and check the total.
- If the draft was created by mistake and is not needed, use Delete from the action menu where allowed.
- For a posted invoice, use an approved correction or credit-note workflow instead of deleting its history.
7Draft invoice with sample data
Training Customer: 2 T-shirts × 75 QAR = 150 QAR. Review the customer, quantity, price and draft status before confirming your own invoice.
View screenshot full size ↗Send or print a customer invoice
- Open the confirmed invoice and verify the customer and email address.
- Choose Send or Send & Print, depending on your version.
- Review the PDF, recipients and message, then send.
- To keep a local copy, use the available download or print action. Check the message history for delivery errors.
Record a full or partial customer payment
- Open the posted invoice and check its remaining amount due.
- Choose Pay or Register Payment and select the actual bank or cash journal.
- Enter the amount actually received, payment date and reference. For a partial payment, keep the remaining balance open.
- Confirm and review the payment entry and residual amount. An In Payment status may remain until bank reconciliation.
Do not record an expected payment as received. Check for an existing payment before registering another.
Direct link to this guideCorrect an issued invoice with a credit note
- Open the original posted invoice and choose Credit Note or Add Credit Note.
- Enter the reason and reversal date, then create the credit note.
- Review the credit-note lines and amount before posting. For a partial correction, retain only the amount being credited.
- Have your accounts team match the credit to the invoice or record the actual refund, then check the balance.
A credit note does not by itself transfer money to the customer or return goods to inventory.
Direct link to this guideFind unpaid and overdue invoices
- Open Customers → Invoices and filter to posted customer invoices.
- Use the Unpaid or payment-status filters available in your version.
- Check Amount Due and Due Date. Include partially paid invoices when following up balances.
- Open each invoice to review payments and notes before contacting the customer.
Purchase orders
Create a request for quotation
- Open Purchase → Orders → Requests for Quotation → New.
- Select the supplier, currency and expected arrival date.
- Add the exact products or variants, quantities, units and agreed or estimated prices.
- Save the request and review its total before sending it to the supplier.
8Sample request for quotation
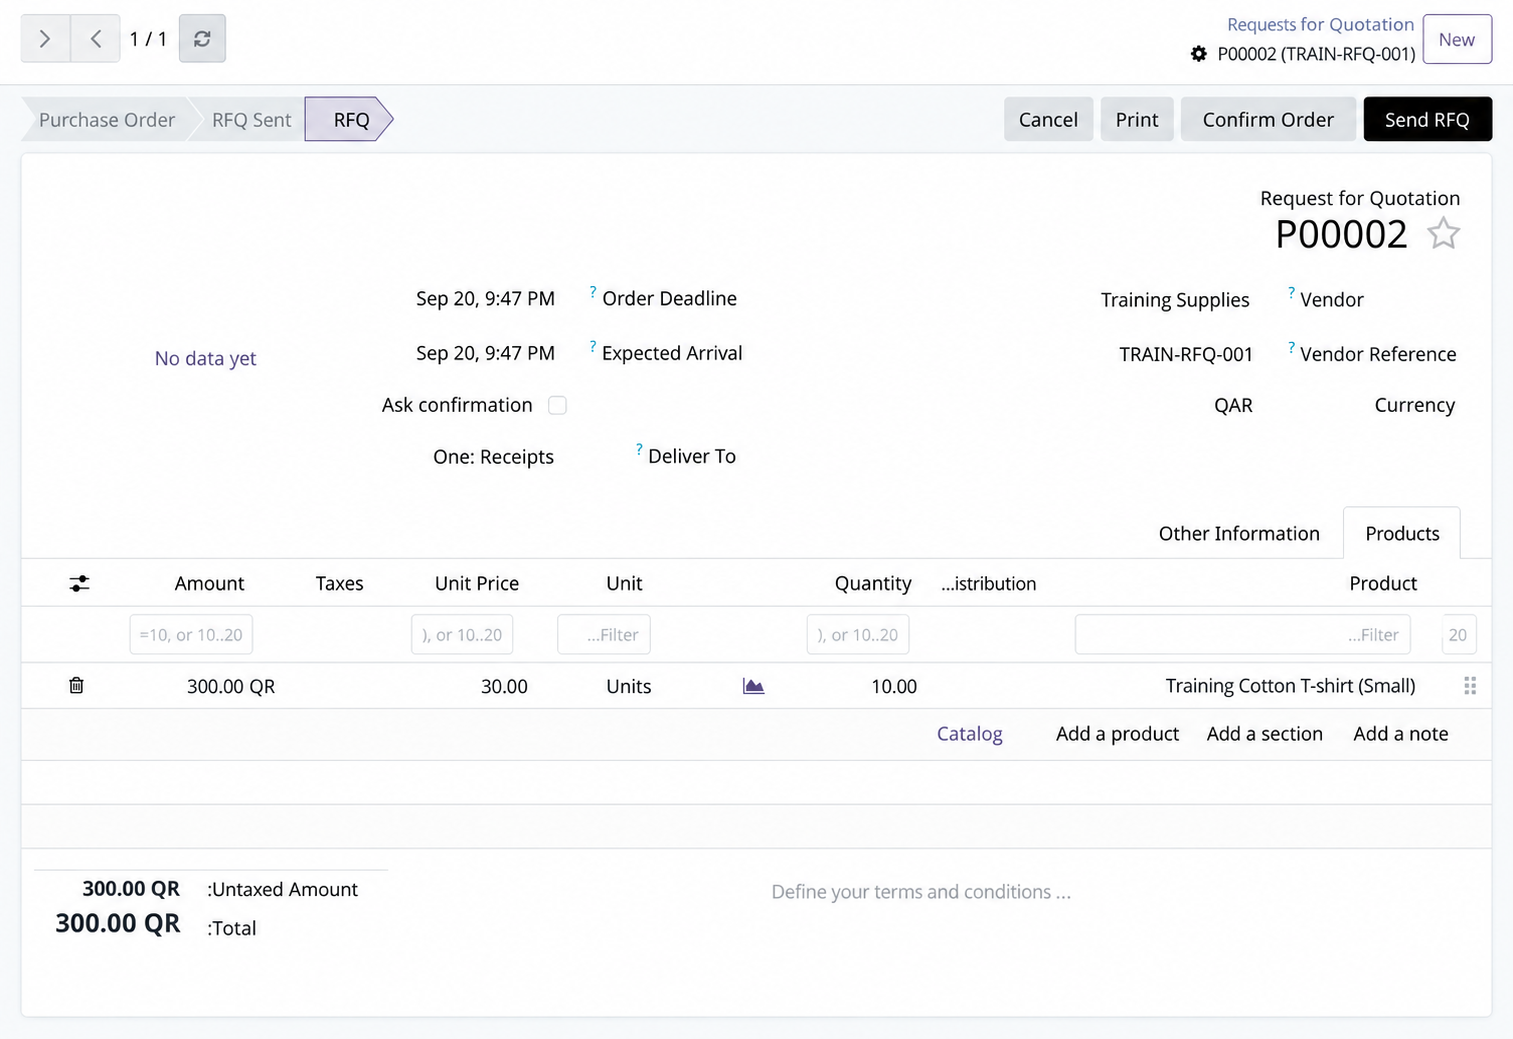
Training Supplies: 10 T-shirts × 30 QAR = 300 QAR. The example remains an RFQ; Confirm Order is the next step after you review the details.
View screenshot full size ↗Edit or delete a draft purchase request
- Open the request and verify that it is still a draft request for quotation.
- Change the supplier, product lines, quantities, prices or expected date as needed.
- Save and send the updated version if the supplier already has the old request.
- To remove an unused draft, choose Delete if permitted. Do not delete completed receipts or bills to remove a purchase order.
8Sample request for quotation
Training Supplies: 10 T-shirts × 30 QAR = 300 QAR. The example remains an RFQ; Confirm Order is the next step after you review the details.
View screenshot full size ↗Confirm a purchase order
- Open the supplier's agreed request for quotation.
- Review quantities, unit prices, currency, delivery address and expected arrival.
- Choose Confirm Order. If approval is required, wait for the authorized manager.
- Check that the order is confirmed and review its linked receipt when one is created.
8Sample request for quotation
Training Supplies: 10 T-shirts × 30 QAR = 300 QAR. The example remains an RFQ; Confirm Order is the next step after you review the details.
View screenshot full size ↗A confirmed purchase order is not proof that goods arrived or the supplier was paid.
Direct link to this guideReceive a full or partial supplier delivery
- Open the purchase order and its Receipt, or find the receipt in Inventory.
- Count the delivered goods and enter the quantities actually received for each variant.
- Enter lot or serial numbers if required, then Validate the receipt.
- For a partial delivery, create a backorder if the remaining goods will arrive later; otherwise review the option to cancel the remainder.
Create a supplier bill from a purchase order
- Open the confirmed purchase order and choose Create Bill when available.
- If billing is based on received quantities, validate the goods actually received first.
- Enter the supplier's invoice reference and bill date. Match lines and totals to the supplier's document.
- Save and confirm only after checking for duplicate bills and quantity or price differences.
Return purchased goods to a supplier
- Open the completed receipt for the goods being returned.
- Choose Return and enter only the products and quantities being sent back.
- Create the return transfer and validate it when the goods actually leave.
- If the goods were billed, handle the supplier credit note separately and check the remaining supplier balance.
Bills & expenses
Record a supplier invoice without a purchase order
- Open Invoicing or Accounting → Vendors → Bills → New.
- Select the supplier and enter the bill date, supplier reference and payment terms.
- Add the purchased items or expense lines and match quantities, prices and taxes to the document.
- Attach the invoice, check for duplicates and confirm the bill when correct.
Recording a bill alone does not receive goods into stock.
Direct link to this guideEdit or delete a draft supplier bill
- Open the bill and check that its status is Draft.
- Correct the supplier reference, dates or line amounts and compare the total with the original invoice.
- Save the corrected draft, or use Delete if it is an unused duplicate and deletion is allowed.
- For a posted bill, ask your accounts team to use the appropriate reversal or supplier credit note.
Record a payment to a supplier
- Open the posted supplier bill and check its remaining amount due.
- Choose Pay or Register Payment and select the bank or cash journal used.
- Enter the actual paid amount, date and payment reference, keeping any unpaid remainder open.
- Confirm and review the bill balance. Complete bank reconciliation through your accounts workflow when required.
Register Payment records the payment in Systemy; it does not necessarily send a bank transfer.
Direct link to this guideAttach a receipt to an existing bill or expense
- Find the existing bill or expense before creating anything new.
- Open the record and use its attachment or paperclip control.
- Upload a readable photo or PDF showing the supplier, date, items and total.
- Open the saved attachment to verify it belongs to this record and is readable.
Attaching a receipt does not change the recorded amount or mark a bill as paid.
Direct link to this guideRecord an employee expense
- If Expenses is included in your subscription, open My Expenses → New.
- Enter the description, approved expense category, date, employee and total amount.
- Choose whether the employee or company paid, and attach the receipt.
- Save and submit through the available approval workflow. Check reimbursement separately if the employee paid.
Do not record the same purchase as both an employee expense and a separate supplier bill unless your accounts team directs that workflow.
Direct link to this guideReview supplier bills due for payment
- Open Vendors → Bills and filter to posted, unpaid or partially paid bills.
- Sort by Due Date and review Amount Due, rather than only the original total.
- Open each bill to check payments, credits and supplier references.
- Use the checked balances to prepare your payment list and record payments only after they occur.
Inventory
Check stock for a product or variant
- Open Inventory → Products and select the product or exact variant.
- Review On Hand for recorded physical stock and Forecasted for expected stock after planned movements.
- Open the quantity details and check the warehouse or location.
- Review reservations and upcoming receipts or deliveries before promising availability.
On Hand is not always the quantity available to sell because some units may be reserved.
Direct link to this guideRecord a physical stock count
- Open Inventory → Operations → Physical Inventory or Inventory Adjustments, depending on your version.
- Select the correct product, variant, location and lot if applicable.
- Enter the total Counted Quantity. If Systemy shows 10 and you count 8, enter 8, not minus 2.
- Review the difference and Apply only after checking recent stock movements and obtaining any required approval.
An inventory adjustment changes stock and may affect valuation. Do not use it instead of recording a real delivery or receipt.
Direct link to this guideMove stock between internal locations
- If multiple locations are enabled, open Inventory → Operations → Transfers → New.
- Choose the Internal Transfer operation and the correct source and destination.
- Add products and quantities, then confirm the transfer and record the quantities actually moved.
- Validate when the move is complete and check stock in both locations.
Receive returned goods from a customer
- Open the completed delivery linked to the original sales order.
- Choose Return and enter only the items and quantities the customer is returning.
- Create the return transfer and validate after inspecting and receiving the goods.
- Check stock and handle any credit note or refund separately through the invoice or POS workflow used for the sale.
Record damaged or unusable stock
- Open Inventory → Operations → Scrap when available.
- Create a scrap record for the exact product or variant.
- Enter the damaged quantity, original location and lot or serial number if required.
- Validate only after approval, then check the recorded stock movement.
Scrap removes usable stock. Do not use it for a sale, transfer or supplier return.
Direct link to this guideInvestigate an unexpected stock quantity
- Open the exact product variant and check the selected warehouse or location.
- Open its stock moves or Inventory reporting history.
- Filter by product and date, then review receipts, deliveries, returns, scrap and adjustments.
- Compare with actual documents and counts. Correct the original operational mistake before making an adjustment.
Point of sale
Make a product available in POS
- Open the product record and its Sales or Point of Sale settings.
- Enable Available in POS and assign the relevant POS category where available.
- Review the selling price, barcode and variants, then save.
- Refresh the POS safely after paid orders synchronize and confirm the product can be found.
1Sample product: Training Cotton T-shirt
Enter the product name, sales price and category. This example uses a price of 75 QAR and the Training Apparel category.
View screenshot full size ↗Open a POS session
- Open Point of Sale and select the correct register or shop.
- Choose Open Register or New Session, depending on your version.
- Count and enter the actual opening cash if cash control is enabled.
- Start the session and check that you are using the correct cashier and payment methods.
Complete a sale in POS
- Search or scan the product and select the exact variant when prompted.
- Check quantities, prices and the order total; select the customer when needed.
- Choose Payment, select the actual payment method and enter the amount received.
- Validate only after payment is successful, then provide the receipt and check that the order is saved.
Selecting Card does not by itself prove that an external card terminal approved the payment.
Direct link to this guideRefund a POS sale
- Open the POS order history and find the original paid order.
- Choose Refund and select only the returned items and quantities.
- Review the negative total and use the appropriate refund payment method.
- Complete the actual cash or card refund, validate the return and give the customer the refund receipt.
An external card refund may need a separate terminal or provider action. Do not process the same refund twice.
Direct link to this guideFind an old POS order and reprint its receipt
- Open the Orders or Ticket screen in the POS.
- Search by receipt reference, customer or date using the available filters.
- Open the matching paid order and verify its items and amount.
- Use Print Receipt or the available reprint action. Do not create a new sale to issue a copy.
Close a POS session and count cash
- Finish open sales and check that paid orders are synchronized.
- Choose Close Register or Close Session and review totals by payment method.
- Count actual cash and enter the counted amount, including recorded cash in and cash out movements.
- Investigate any difference, add the required explanation and complete closing with the appropriate approval.
Do not change the count to match the expected amount without checking the difference.
Direct link to this guideOnline store
Publish or hide an online product
- If your subscription includes an online store, open the product and use Go to Website.
- Check the title, images, price, variants and description on the correct website.
- Use the Published / Unpublished control to show or hide the product.
- Check the product as a signed-out visitor. Unpublishing hides it from the website without deleting its internal record.
Create a category for the online store
- Open Website → eCommerce → eCommerce Categories, or the matching category menu in your version.
- Create the category, enter its name and choose a parent category if needed.
- Open the relevant products and assign their eCommerce Categories.
- Save and check the shop category list as a visitor.
Edit an online product description
- Open the product page on your website while signed in with website editing access.
- Choose Edit and select the product description area.
- Write the useful details: material, dimensions, included items or care instructions. Avoid copying a different product's details.
- Save, then check the page on mobile and in each published language.
Translate product text for the other language
- Open the product page and switch the website to the language you want to edit.
- Use the website's Translate mode if available to translate the name and description.
- Save the translated text without replacing the source-language wording.
- Switch between the two languages and check both the product text and any category labels.
Find and process a website order
- Open the website's Orders list or find the order in Sales by its reference.
- Review the order status, customer details, delivery address and payment transaction.
- Verify payment according to the selected method. Cash on delivery can remain unpaid until collection.
- Continue the confirmed order's delivery and invoicing workflow, then check the final statuses.
A created order or a payment screenshot alone is not proof of a successful online payment.
Direct link to this guideFind out why a product is missing from the shop
- Open the product and check that it is active and enabled for sale.
- Check its publication status and website assignment, especially if you have multiple websites.
- Review its eCommerce category and any configured availability or zero-price rules.
- Remove shop filters and search as a signed-out visitor. If still missing, send support the product name and page link.
Daily work & reports
Find records with search, filters and groups
- Open the relevant list, such as Products, Invoices or Purchase Orders.
- Type a name or reference and choose the matching search field when offered.
- Use Filters to narrow by status or date, and Group By to organize by customer, category or another available field.
- Remove active search chips if expected records are missing, then check archived records where relevant.
Export selected records to a spreadsheet
- Open the relevant list and apply the filters you need.
- Select the records and verify whether the selection covers only this page or all matching records.
- Choose Export from the action menu if your permissions allow it, then select the fields you need.
- Download the file and compare its row count and headings with your intended selection.
Export only the customer or business information needed for the task and share it with authorized people.
Direct link to this guideImport products from a spreadsheet
- From the product list, open Import Records if available and download a template or export a sample record first.
- Prepare a small sample with consistent names, references, prices and existing category names.
- Upload the file, map each column and use Test to fix errors before importing.
- Import the sample and inspect the results before importing the remaining rows. Use stable External IDs when updating existing records.
Import can create duplicates or overwrite data. Keep a backup export and do not map stock quantities as ordinary product fields.
Direct link to this guideReview monthly sales performance
- Open the relevant reporting area: Sales analysis for sales orders, or Point of Sale reporting for POS orders.
- Set a precise date range and check which date field and order statuses the report uses.
- Group by month, product or customer and select the measure you need, such as quantity or untaxed sales.
- Check returns, cancelled orders and taxes before comparing totals with invoices or bank receipts.
Sales, invoiced revenue and cash received are different measures and may not match for the same month.
Direct link to this guideChange your language and time zone
- Open your user menu and choose Preferences or My Profile.
- Select your preferred interface language from the installed languages.
- Choose the correct time zone for your location; for Qatar use Asia/Qatar where listed.
- Save, refresh the page and check a known appointment or document time.
These are your user preferences. They do not automatically change every employee's settings.
Direct link to this guideResolve a missing menu or blocked action
- Check that you are in the correct company and the correct app.
- Confirm that the feature is included and enabled for your subscription.
- Ask your administrator to check your role and permissions if colleagues can see the option but you cannot.
- If an error remains, contact Systemy support with the page link, action attempted and a screenshot with private data hidden.
No matching tutorials
Try a shorter keyword or choose All topics.
Watch the video tutorials
Systemy video tutorial
Create product variants
Watch on YouTubeSystemy video tutorial
Organize product categories
Watch on YouTubeSystemy video tutorial
Create a new product
Watch on YouTubeHelp with your own setup
Send support the task you are trying to complete and where you got stuck.